 Brainstorms always brew at the most inconvenient times: when I’m trying to sleep, when the hubby’s busy, or when I’m home alone. The reason this is a problem is I always have to do it now! And “it” usually involves moving furniture or some other task that a third or fourth arm would make significantly easier.
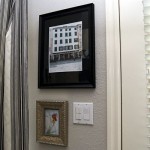
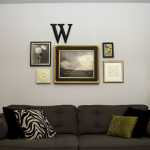
This time it was hanging an arrangement of hodge-podge art in a line from ceiling to floor. I wanted every edge lined up two inches from the corner of the wall. It could work. In fact, it could look awesome! Or it could look stupid. It’s one of those times it might be helpful to grab the nearest passerby and say, “Here, hold this.” Then step back and take a look to make sure your brilliant brainstorm is in fact brilliant. But there was no such passerby in my guest room.
Eh. I’m going to do it anyway.
How to Hang Things By Yourself in (*muffled*) Easy Steps
 Arm yourself with measuring tools, a level, and a pencil. Preferably a hot pink one leftover from grade school.
 Decide how you want your ragamuffin arrangement arranged. Lay it out on the nearest large surface.
 Tear the back holder-uppers off any frames that are supposed to sit on a table so they can hang flush on the wall without the stander-uppers sticking out the back because that just looks silly. Besides, that frame has been in a closet for 47 months. Just commit.
 Measure the length and width of your arrangement, then hold those measurements on the wall with a tape measurer to see where you want them to be. Don’t clean up all the junk that’s only sort of in the way. It’ll only slow you down.
 Run downstairs for the fourth time because in your haste and excitement, you forgot your girl hammer and nails.
Go ahead and hang your first piece (the top and/or middle piece). This will be your reference point for the rest.
 This is where the hot pink pencil comes in. Resist the temptation to just start hammering. Trust me. That’s my old method, and I have a dandy collection of holes behind every wall hanging. (Next in this series: Fun with Spackling.) The key is to measure and mark, measure and mark.
Measure the distance from one picture to the next, adding an inch or two for space between them.
 Measure that distance on the wall, from the first nail hole to where the second will go, and mark it with your pencil.
 Keep doing this for each pic. Once you’ve marked each nail hole, you’re allowed to pick up the hammer again. Add nails. Add art.
 Now clean up all the mess so you can take a picture to show off to your friends. And revel in the glory of a brainstorm that is in fact awesome.
 Bonus feature: Girl hammer. My dad and brothers teamed up and gave me a “girl toolbox” as a wedding gift. I wish I could say I remember what was in it, but it doesn’t matter. Because it contained this hammer. It has flowers and hidden screwdrivers. If you don’t have one, you need one.

 I'm Amy Hadley. On HNWN! I give ideas and inspiration for organizing, decorating and homemaking. It's your home. You should love it.
  Vintage Aprons
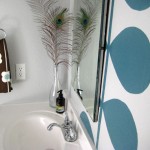 Modern Bathroom Mural
 Fabric Flower Collage
 Polishing Pumpkins
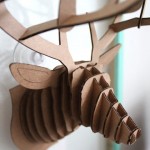 Cardboard Taxidermy
 Adding Storage: Clothes rack
 Handmade Christmas Gifts
 Christmas Tablescapes
 Sweet Pillowcase Nothings
8 Comments
Looks completely awesome! So you’re saying I shouldn’t just forge ahead and do stuff hastily in my excitement ’cause I’ll screw it up? Do you have hidden cameras in my home? Fine, I guess I’ll measure and do it all the “right” way.
And that has to be the BEST wedding present ever. Somebody knows you very well… 🙂
They knew me better than I know myself… I wasn’t the decorating fiend then that I am now.:) I love my girl hammer!
That turned out so great! Now I’m looking for where I can do that in my own home!
Thx Tiffany! Funny thing is almost all of these were hiding in a closet because I didn’t think I had anywhere to put them. :/
I think this in-a-line arrangement works well next to an outside corner of a wall (versus an inside one), or near a doorway, like a closet.
Hey Amy!
Great post… and so true. Nice job on the photos!
Thanks Kim! I’m single-handedly trying to prove to people what you can do with a point-and-shoot. (*Cough* While saving up for an SLR:) ). (BTW, anyone who’s looking for a great graphic designer or photographer, lady Kim is awesome!)
Just recently found your blog. I love the girl hammer and all the pieces on the wall, especially the canvas. 🙂
Thx JoAnn! The girl hammer is definitely one of my most prized possessions.:)